Are you looking to add social media icons to your website’s navigation menu? In this article we will be showing you a step-by-step guide to add social media icons to WordPress Menu.
![]()
Add Social Media Icons to WordPress Menu
To further enhance the look of your website, you may want to add social media icons to the navigation menu.
This will not only enhance your website’s look, but it will also likely lead to an increase in social media followers as your website’s readers can easily visit your social media pages.
TEXT AD1Unfortunately, the majority of WordPress themes do not have the option to add social media icons to a menu.
You can however make use of plugins to add social media icons to your navigation menu.
For this tutorial we will be using a plugin called Menu Image.
1. Install Menu Image Plugin
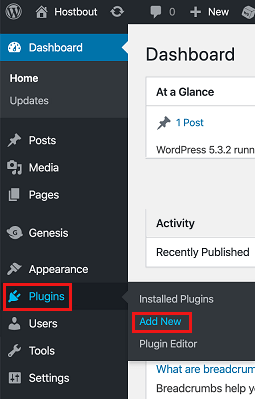
In the WordPress dashboard, click on Plugins > Add New.
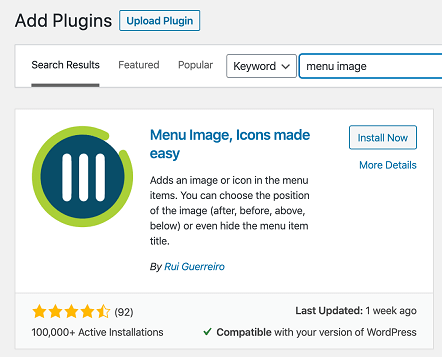
Next search for the Menu Image plugin and then click on Install and then Activate to install the plugin to your website.
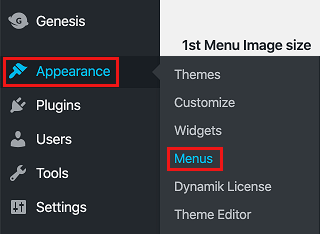
2. Once the plugin has been installed, click on Appearance > Menus
3. Add a Custom Link Menu Item
Select the menu you want to edit (your website’s default navigation menu).
TEXT AD2After selecting the default navigation menu, click on Custom Links.
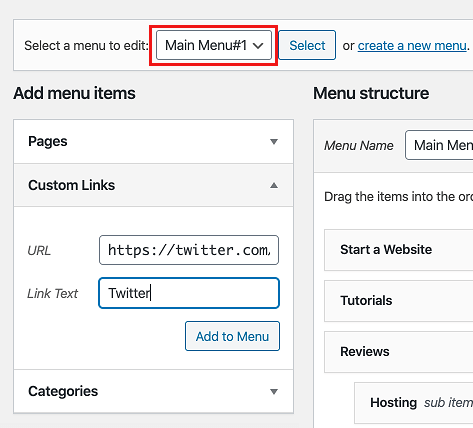
Now enter the URL to your social media handle in the URL section and then enter in the social media name in the Link Text section.
Click on Add to Menu button to add this custom link to your navigation menu.
4. Open Custom Link and Select an Image
Click on the dropdown next to the menu item you just created. After clicking on the dropdown, you will notice a wide range of options.
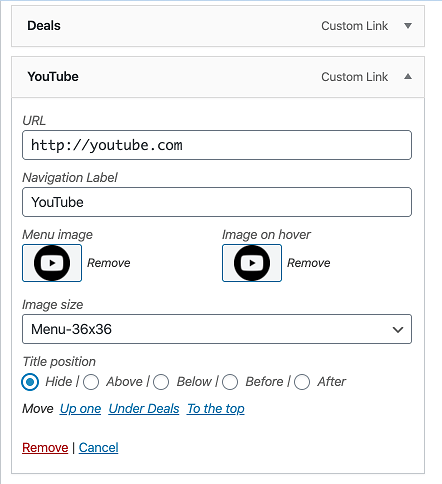
To display a social media icon, you need to click on the Set Image button and then upload the relevant social media icon for the menu item.
![]()
Note: You need to be careful that you add social media icons that have been labelled free to use in order to avoid copyright violations.
5. Choose Icon Size and Customize
After uploading the social media icon, you can choose the icon size to be displayed. Typically for navigation menus you will want to choose one of the three following sizes: 24 x 24, 36 x 36, 48 x 48.
You can also choose to add a separate icon that should be displayed on hover. For example, you can choose to have a black icon appear on hover, while a blue icon appears normally.
If you want only the social media icon to be displayed, then select Hide under the title position option.
6. Repeat for Other Social Media Accounts
Once you have added your first social media icon, repeat steps 3-5 for all remaining social media icons you would like to add to your navigation menu.
7. Click on Save Menu
After you have added all the social media icons, click on the Save Menu button to save your changes.
Now when you visit your website, you should be able to see that the social media icons have been added to your navigation menu (See Image below).
![]()
If you cannot see the social media icons, then try clearing your website’s cache and/or browser’s cache.